

Immunohistochemistry Protocol for Frozen Sections
Methods and Principles from our Scientific Staff
The basic steps of IHC (NBF/Par.) protocol are as follows:
- Fixation and paraffin embedding
- Cutting and mounting
- Deparaffinization and rehydration
- Antigen retrieval/Pretreatment (If Necessary)
- Immunohistochemical staining
- Counterstaining (If Desired)
- Dehydration and mounting
- Visualization with microscope
Protocol Optimization
When beginning to work with new primary antibodies in your lab for IHC (NBF/Par.) staining, the staining protocols must be optimized to achieve optimal staining results. Careful consideration of the two following variables must be taken during the IHC (NBF/Par.) protocol optimization steps.
1. Antigen retrieval/Pretreatment – Every antigen is different. Some antigens may require harsher pretreatment methods in order to “unmask” their epitopes while some antigens may not require pretreatment at all.
Initially, try staining without pretreatment and also using one or all of the following methods.
Heat-induced Antigen Retrieval, low pH: Sodium citrate 10 mM, pH 6.0
Heat-induced Antigen Retrieval, high pH: Tris/EDTA pH 9.0
Enzymatic Antigen Retrieval: trypsin, pepsin, or other protease
2. Primary antibody concentration – Once the optimal pretreatment method is determined, the primary antibody concentration can be optimized. Five concentrations from 5 μg/ml ranging down to ~0.25 μg/ml should initially be tried, using a 1 hour 37˚C primary antibody incubation time.
Fixation and Paraffin Embedding
Fixation is the most important factor to the success of IHC staining. 10% neutral buffered formalin (NBF) is the most commonly used fixative. The ideal fixation time will depend on the size and thickness of the tissue sample and upon the type of tissue. However, fixation times between 18-24 hours should be ideal for most situations. Over fixation can result in poor or no staining and under fixation will result in edge effect, high background and/or poor resolution.
Cutting and Mounting
Following fixation, the tissue sample will be embedded in paraffin and cut using a microtome. The ideal tissue section thickness is 3 – 6 microns. Positively charged slides will help the tissue adhere to the slides, however poor quality positively charged slides may cause inconsistent staining results. Once mounted, the slides must be dried to remove any water that may be trapped under the section. This is ideally accomplished by leaving the slides at room temperature overnight or by placing in an incubator set to 50ºC for a couple of hours.
Deparaffinization and Rehydration
Prior to pretreatment, the slides must be deparaffinized and passed through a rehydration series. Failure to properly deparaffinize and rehydrate the tissue will result in poor staining results.
Required materials and reagents :
- Xylene
- 100% ethanol
- Slide rack
- Staining Dish/Coplin Jar
Place the slides in a rack, and perform the following washes:
- Xylene: 2 x 5 minutes
- 100% ethanol: 2 x 3 minutes
- 95% ethanol: 3 minutes
- 70% ethanol: 3 minutes
- 50% ethanol: 3 minutes
- Gently running cold tap water to rinse
Keep the slides in water until ready to perform antigen retrieval or proceed with the IHC staining protocol. Tissue sections must remain hydrated from this point on. Allowing the tissue sections to dry will result in non-specific staining.
Antigen Retrieval
Most antigens require an antigen retrieval step before antibody binding can occur on formalin fixed tissue. This is due to cross-linking of proteins during fixation which masks epitopes. The two methods of antigen retrieval are heat-induced and enzymatic. Both methods act by breaking the methylene bridges and exposing the epitopes in order to allow binding of the primary antibody. Heat-induced epitope retrieval is most often performed using a pressure cooker, a microwave, or a vegetable steamer.
Two common buffers for heat-induced epitope retrieval:
Low pH Sodium Citrate Buffer (10mM Sodium Citrate, 0.05% Tween 20, pH 6.0)
Tri-sodium citrate (dihydrate): 2.94 g
Distilled water: 1000 ml
Mix to dissolve. Adjust pH to 6.0 with 1N HCl. Add 0.5 ml of Tween 20 and mix.
Store at room temperature for 3 months or at 4˚C for extended shelf life.
High pH Tris-EDTA Buffer (10mM Tris Base, 1mM EDTA Solution, 0.05% Tween 20, pH 9.0)
Tris: 1.21 g
EDTA: 0.37 g
Distilled water: 1000 ml (100 ml to make 10x, 50 ml to make 20x)
Mix to dissolve. Adjust pH to 9.0 (may not require adjustment). Add 0.5 ml of Tween 20 and mix.
Store at room temperature for 3 months or at 4˚C for extended shelf life.
Heat-induced antigen retrieval methods:
a) Pressure cooker
Slides should be placed in a metal rack for this procedure.
Materials and reagents:
- Domestic pressure cooker
- Hot plate
- Vessel with slide rack to hold approximately 400-500 ml
- Antigen retrieval buffer (i.e. Tris/EDTA pH 9.0 or sodium citrate pH 6.0)
Protocol
- Place the pressure cooker on the hotplate and turn it on high. Do not secure the lid of the pressure cooker at this point, simply rest it on top. While waiting for the pressure cooker to boil, deparaffinize and rehydrate the sections.
- Once boiling, transfer the slides from the tap water to the pressure cooker. USE CARE WITH HOT SOLUTION – USE FORCEPS! Secure the pressure cooker lid as per the manufacturer’s instructions.
- As soon as the cooker has reached full pressure (see manufacturers instructions), time 3 minutes.
- After 3 minutes, turn off the hotplate and place the pressure cooker in an empty sink.
- Activate the pressure release valve (see manufacturer’s instructions) and run cold water over the cooker. Once depressurized, open the lid and run cold water into the cooker (not directly onto the slides) for ~5 minutes.
- Continue with the IHC staining protocol.
Note
Three minutes is only suggested as a starting point. Less than 3 minutes may leave the antigens under-retrieved, leading to weak staining. More than 3 minutes may leave them over-retrieved, leading to non-specific background staining and also increasing the chances of sections dissociating from the slides.
b) Microwave
Using a domestic microwave is not recommended. Hot and cold spots are common and will worsen over time. This will lead to inconsistent antigen retrieval. A scientific microwave is much more reliable.
Slides should be placed in a plastic rack and vessel for this procedure. Standard glass histology staining racks and vessels will crack when heated.
Materials and reagents:
- Scientific microwave
- Microwaveable vessel with slide rack to hold approximately 400-500 ml
- Antigen retrieval buffer (e.g. Tris/EDTA pH 9.0, sodium citrate pH 6.0)
Protocol
- Deparaffinize and rehydrate the sections.
- Add the appropriate antigen retrieval buffer to the microwaveable vessel.
- Remove the slides from the tap water and place them in the microwaveable vessel. Place the vessel inside the microwave. If using a domestic microwave, set it to full power and wait until the solution comes to a boil. Boil for 20 minutes from this point. If using a scientific microwave, program so that antigens are retrieved for 20 minutes once the temperature has reached 98°C.
- When 20 minutes has elapsed, remove the vessel and run cold tap water into it for 10 minutes. Use care with hot solution.
- Continue with the IHC staining protocol.
Notes
Use a sufficient antigen retrieval solution to cover the slides by at least a couple inches if using a non-sealed vessel to allow for evaporation during the boil. Be sure to watch for evaporation and for boiling over during the procedure. Do not allow the slides to dry out.
20 minutes is only a suggested antigen retrieval time. Less than 20 minutes may leave the antigens underretrieved, leading to weak staining. More than 20 minutes may leave them over-retrieved, leading to nonspecific background staining and also increasing the chances of sections dissociating from the slides.
c) Vegetable steamer
A vegetable steamer or rice cooker will provide good, consistent results for heat-mediated antigen retrieval. The procedure is similar to microwaving in that it maintains the temperature of the buffer at 100°C, but without the vigorous boiling of the microwave method, which will reduce the risk of the slides drying out.
Slides should be placed in a plastic or metal rack and vessel for this procedure. Standard glass histology staining racks and vessels will crack when heated.
Materials and reagents:
- Vegetable steamer
- Vessel with slide rack to hold approximately 400-500 ml
- Antigen retrieval buffer (e.g. Tris/EDTA pH 9.0, sodium citrate pH 6.0)
Protocol
- Deparaffinize and rehydrate the sections.
- Set up the vegetable steamer according to the manufacturer’s instructions and preheat.
- Pre-heat the appropriate antigen retrieval buffer to boiling in a flask with a microwave or on a hot plate.
- Put the container that will hold the rack of slides into the vegetable steamer.
- Carefully add the hot buffer to the container, followed by the rack of slides.
- Close the lid of the steamer. The container of buffer should also have a lid. The rack of slides will initially bring the temperature of the AR solution down but it will return to 95 – 100˚C within minutes.
- Keep the container in the steamer for 20 minutes from this point.
- After 20 minutes, remove the vessel and run cold tap water into it for 10 minutes. Use care with hot solution.
- Continue with the IHC staining protocol.
Enzymatic antigen retrieval:
Choice of enzyme will be indicated on the datasheet for the antibody. If not, trypsin has been shown to be useful for a wide range of antigens that require retrieval. There are at least two methods for applying the enzyme solution to the tissue: directly pipetting the solution onto the tissue on the slide, or placing a rack of tissue slides into a container of enzyme solution. The first method uses less reagent, but since each slide needs to be handled individually, the incubation time needs to be monitored carefully for each slide to ensure all slides are receiving the same treatment. For this reason, it is easier to treat batches of slides by immersing them in a container of enzyme solution.
a) Enzymatic retrieval, pipetting method
Materials and reagents:
- 37ºC incubator
- Humidified chamber (either the incubator itself or a container with a wet paper towel)
- Two slide rack containers of TBS with slide rack.
- Enzymatic antigen retrieval solution
The following method uses trypsin. There are commercially available trypsin preparations optimized for IHC or it can be prepared as follows:
Trypsin: 50 mg
Distilled water: 10 ml
Mix to dissolve. Store at -20ºC.
- Calcium Chloride Stock Solution (1%)
- Calcium chloride 0.1 g
- Distilled water 10 ml
- Mix well and store at 4ºC.
- Trypsin Working Solution (0.05%)
- Trypsin stock solution (0.5%) 1 ml
- Calcium chloride stock solution 1% 1 ml
- Distilled Water 8 ml
- Adjust pH to 7.8 with 1N NaOH. Store at 4ºC for one month or -20ºC for long term storage.
Protocol
- Prepare the trypsin and pre-heat to 37ºC. Carefully blot excess water from the around the tissue section and pipet the enzyme solution (generally 50 – 100 ul will suffice) onto the section, making sure to completely cover each tissue section.
- Place the slides in a humidified container and then into the 37ºC incubator. Ideally, the container holding the slides is pre-heated in the incubator.
- After 10 – 20 minutes (requires optimization), remove the slides from the incubator and transfer to a rack in a container of tap water. Rinse by running tap water for 3 minutes.
- Continue with IHC staining protocol.
b) Enzymatic retrieval, immersion method
Materials and reagents:
- 37ºC waterbath
- Slide racks and slide rack containers
- Enzymatic antigen retrieval solution
Protocol
- Set water bath to the optimal temperature for the enzyme you are using. Add ultrapure water to two containers that can hold slide racks. Place the containers into the water bath to warm. (See note ii).
- Deparaffinize and rehydrate sections as above. Place slides in one water container to warm
- Prepare the enzymatic antigen retrieval buffer from the warm water in the other container, and then return the container to the water bath to allow the solution to re-heat.
- Transfer the warmed slides into the enzyme solution for 10 – 20 minutes with intermittent gentle agitation, then remove the slides and place them in running tap water for 3 minutes to rinse off the enzyme.
- Continue with IHC staining protocol.
Notes
Use a sufficient volume of water or buffer to cover the slides. Placing cold slides into the enzyme solution will lower the temperature of the solution, reducing enzyme activity and leading to under-retrieval of the antigenic site. Ten to twenty minutes is only suggested as a starting point incubation time. Less than 10 minutes may leave the antigens under retrieved, leading to weak staining. More than 20 minutes may leave them over retrieved, leading to non-specific background staining and also increasing the chances of sections dissociating from the slides or damage to the morphology of the tissue.
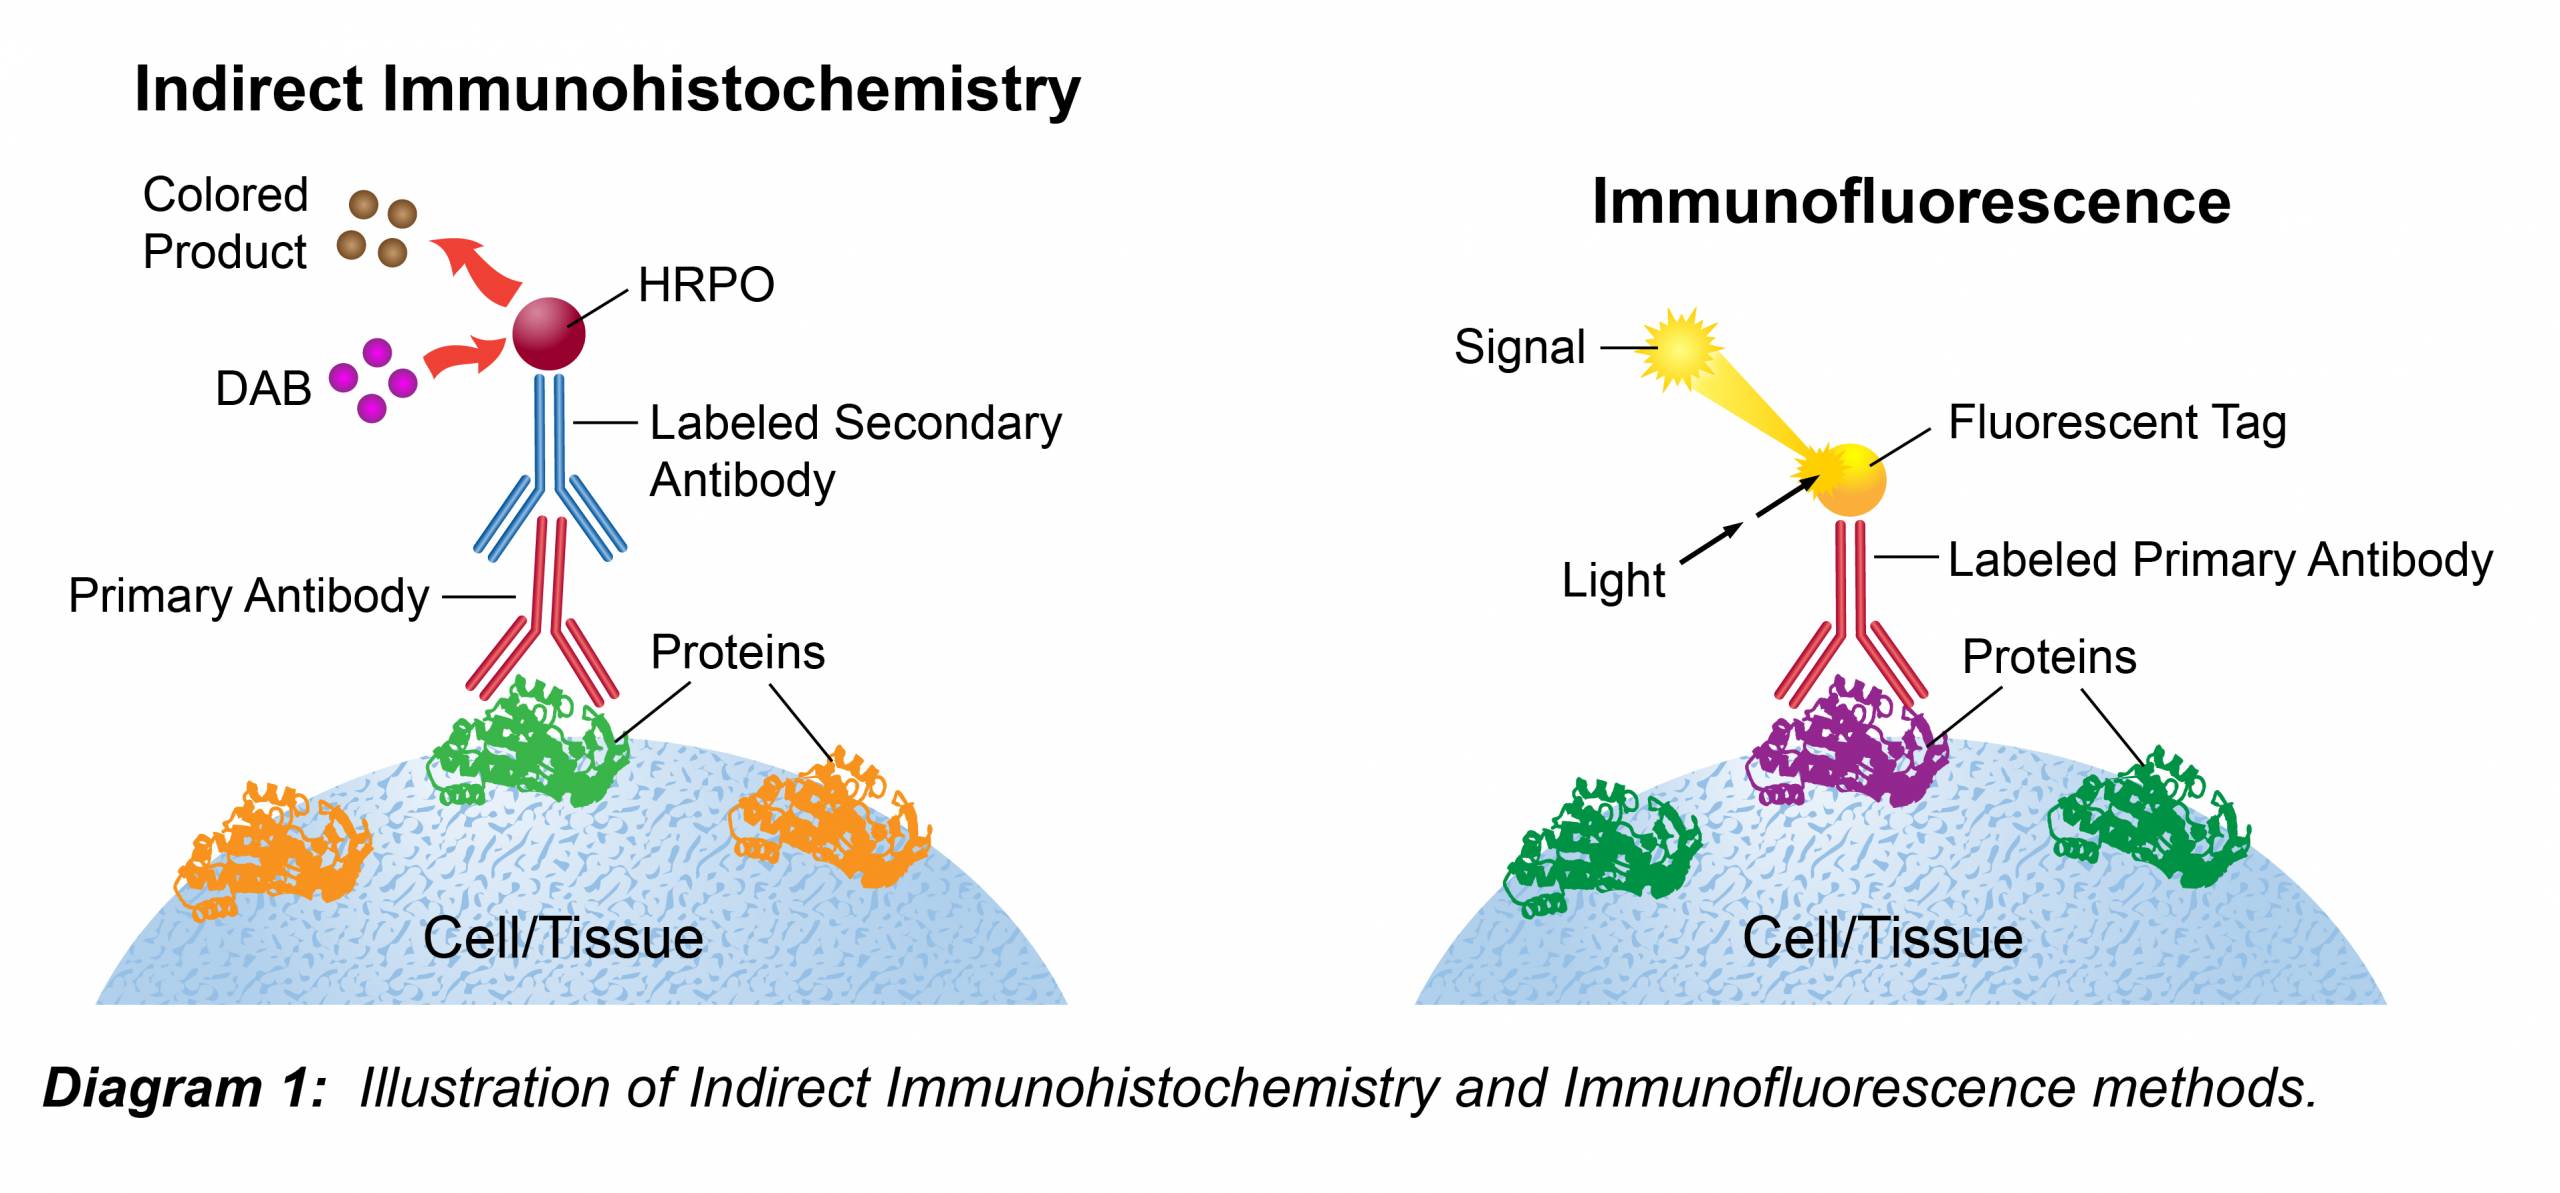
Immunohistochemical Staining
Protocol
If necessary, perform antigen retrieval before commencing with the following steps.
Note: All incubations should be carried out in a humidified chamber to avoid drying of the tissue.
- If using an HRP conjugate for detection, blocking of endogenous peroxidase can be performed here or after the primary antibody incubation.
- Wash the slides 2 x 5 minutes in TBS plus 0.025% Triton X-100 with gentle agitation.
- Block in 10% normal serum with 1% BSA in TBS for 2 hours at room temperature.
- Drain slides for a few seconds (do not rinse) and wipe around the sections with a paper towel.
- Apply primary antibody diluted in TBS with 1% BSA.
- Incubate for 1 hour at 37°C.
- Rinse 2 x 5min TBS 0.025% Triton with gentle agitation.
- If using an HRP conjugate for detection, incubate the slides in 0.3% H2O2 in TBS for 15 min
- For enzymatic detection (HRP or AP secondary conjugates): Apply enzyme-conjugated secondary antibody to the slide diluted to the concentration recommended by the manufacturer in TBS with 1% BSA, and incubate for 30 min at 37°C.
- For fluorescent detection: Apply fluorophore-conjugated secondary antibody to the slide diluted to the concentration recommended by the manufacturer in TBS with 1% BSA, and incubate for 1 hour at room temperature. This step should be done in the dark to avoid photobleaching.
- Rinse 3 x 5min TBS.
If using fluorescent detection, end at this step and coverslip with an appropriate mounting medium.
If visualizing the protein with a chromogen, continue with the following steps:- Develop with chromogen for 10 min at room temperature.
- Rinse in running tap water for 5 min.
- Counterstain (if required).
- Dehydrate, clear and mount.
Controls
To estimate the contribution of the non-specific interaction, staining protocols using an antibody directed to an irrelevant antigen having the same isotype as the antibody of interest may be analyzed in parallel with the antibody of interest. The antibody directed to the irrelevant antigen is known as the isotype control.
Notes
It is recommended to keep a spreadsheet in your lab of the optimal staining conditions for each antibody; including pretreatment method details, primary antibody concentration and primary antibody incubation time.
The use of 0.025% Triton X-100 in the TBS helps to reduce surface tension, allowing reagents to cover the whole tissue section with ease. It is also believed to dissolve Fc receptors, therefore reducing non-specific binding.
The secondary antibody may cross react with endogenous immunoglobulins in the tissue. This is minimized by pre-treating the tissue with normal serum from the species in which the secondary was raised. The use of normal serum before the application of the primary also eliminates Fc receptor binding of both the primary and secondary antibody.
H2O2 suppresses endogenous peroxidase activity and therefore reduces background staining.
